Showing posts with label Little Projects. Show all posts

Tuesday, February 5, 2013

Home processes

The process of making a house a home is more involved than I imagined. And more expensive. Plus, I have the attention span of a gnat so it is sometimes hard for me to focus on one thing. I'll give you an example here: I am currently re-organizing the office which includes piles of papers, etc on the floor AND I am organizing our recipes which involves piles of papers, recipes and magazines. I started both of those "projects" last weekend. Really, what was I thinking? Apparently not much. Oh well.

While I am in the midst of two organization projects, my brain is wandering to other projects because what's the fun in actually completing something? Anywho, I have been contemplating the many options for our tv wall in the den since, oh, the day we moved in and put our tv on the same old Ikea tv stand. Ugh.

What I like:


Top row: Restoration Hardware, Bottom Row: Pottery Barn

I honestly don't want to spend that kind of money on a media console so I'm considering different options including some projects from Ana White. She has plans for the RH Printmaker's media console (middle top) as well as a plan for an apothecary style media console like the bottom right. The husband and I are also somewhat curious about welding and one of our neighbors is apparently somewhat skilled at it (which would open up the potential to do something like the top left). The weather is warming up and I'm itching to do a project so we'll see what the next months bring us. Of course, maybe I'll just work on finishing one of my current projects! :)


Thursday, January 24, 2013

Progress in the dining room

You probably remember that last year we purchased our dining room table and chairs. Up until that point, our dining room had been our dog's room. Really, it was.


So we felt great about adding the table and chairs.


The next priority for me was a light. I looked around the interwebs quite a bit and decided I loved the West Elm glass jar pendants. I quickly added them to my Amazon wishlist which I keep stocked full of items I love/want. I expected to buy them after Christmas but was wonderfully surprised to receive them from my in laws! Such an awesome gift.


We were stuck with the best way to hang them, as the husband did not want to create two more holes in the ceiling to accommodate the pendants. I reviewed several of my Pinterest boards and found a picture of something that just might work. We bought a dowel, the husband cut it and spray painted it and we hung the lights. I really like the end the result and it was actually pretty easy!


While I'm super excited to have a great set of lights, the room is a hot mess right now. We still need to finish cleaning up from the pantry and cabinet reorganization and get rid of a few extra things we're currently 'storing' in the dining room. Then we can move on to fun things like wall art (and you might get to see how the entire room looks)!


Tuesday, January 22, 2013

The last piece

One of the first projects we tackled in the new year was the final piece of our pantry make-over. While there are still a few organizing things remaining, the last major addition to the pantry was a spice rack. Our spices truly were getting the best of us and when I really thought about it, so were our oils and vinegars.


I either had to grab a chair to reach an oil or vinegar I needed or we bought more thinking we had run out when all along we had a perfectly good bottle of ____ vinegar (or oil) hiding in the back of the shelf. I think we have 4 bottles of apple cider vinegar for this exact reason.

And the spices numbered so many that they were overflowing into an extremely unorganized mess on the bottom shelves of another cabinet.


While having the spices and oils/vinegars right next to the stove is helpful, our pantry door is essentially right next to the stove when open. So we had no issue rethinking our kitchen organization and moving those items to the pantry.

When we looked at the door we decided building two separate units would be the best solution and the husband got to work on it one Saturday morning. It took him a few hours to build both racks and install them. I opted to leave them unfinished. I thought the stain we used for the shelves would be too dark and I hate painting so...unfinished they stay! :)


In the next picture you can see our new spice bottles. We buy a lot of spices in the bulk food section of the grocery store and needed bottles that would keep them fresh. We searched a number of places (Ikea, Container Store, World Market, etc) but had a difficult time finding containers that had a quality seal. Our search ended when I found these bottles. Woo-hoo!


Thursday, January 17, 2013

The end of year project(s)

I knew the days between Christmas and New Years would be the perfect time for us to accomplish a larger project - one that might require a little more than the two days of each weekend.

While we had a lot of options for this project, I decided to go with painting our bedroom. Yes, we did paint it once. And I hated the color. HATED it. It was my first experience picking out a grey and man oh man did I do a terrible job.


I even had another paint color picked out before I finished the bed skirt (and b/c I'm a visual person, I took a picture of the sample):


The new color is much warmer and is a subtle blue-green. I like it infinitely better than the terrible grey. Plus it actually goes well with the other colors in our house, rather than seeming like a cold random room.


The husband and I are quite the painting team. I always do the cutting in (or edging) and trim and he does the rolling. We can usually knock out some painting pretty quickly but with a room this size, extra large trim, and the need for three coats, this job took us a couple of days. It was totally worth it though!

In between coats, our second big job was the installation of all new blinds in the ENTIRE house. Yep friends, we bit the bullet and used some much appreciated graduation money (thanks mom, dad, and Honey) to buy 3 custom sized blinds and 17 additional blinds for our house. Whoa.

In addition to really odd paint colors, when we bought our home only two rooms (the master bedroom and guest bedroom) had blinds. The blinds in the master were so disgusting they were yellow. We've basically lived with crappy blinds or no blinds since we moved in.


While the sun shining in the room above looks nice and only a person standing directly in front of our garage can see in the windows, we thought it might be nice to finally put in blinds.


Wednesday, April 11, 2012

Proactive gardening


When we began gardening we weren't prepared for a lot of things. That first season was spent reacting to issues rather than anticipating and proactively preparing for issues. As a result we learned a lot, especially what not to do!

Some of the 'fixes' we made last year were last minute and not always the best approach. This year we're working on improving multiple aspects of our gardening. I updated a little about how we were working on improving on cost of plants and plants in general. In addition to these updates I really wanted to update the structure and landscaping around the garden so it was more visually appealing.

Last year we were faced with a pretty serious bird problem mid-season and our quick fix was bird netting suspended by PVC piping.


Although the fix worked (except for the time a pair of birds got stuck under the netting), it was not visually appealing or all that functional - we had to unpin the net and climb under it every time we picked veggies.

Finally, the area where we put the garden is a no-mans land as far as grass goes so its a muddy mess most of the time. In addition to wanting something a little more aesthetic, I also wanted to make the space more functional. We had some extra dirt from removing the beds and trees in the front and we had extra stone that needed new homes.

I suggested that we use the dirt to build up the area around the beds and use the stone to make it easier to walk around and to decrease the muddiness factor. I also found a nice image online of a garden with netting and the husband designed an inexpensive frame for the large garden. Here is the garden so far.

 We need to attach the netting but the frame is built and only took us (mostly the husband) a few hours one Sunday afternoon.

 We now have a door into the netted area.


 The new bed and the rocks.


I think its starting to look a lot better and is definitely going to be easier to deal with now!

Now some close-ups!


Monday, April 9, 2012

A peak

Here's a peak into our lives over the past few weeks.

We tried our hands at taking pictures of a friend's little boy in bluebonnets. Pretty much a fail, mainly because the thought of walking around in tall grass in Texas didn't seem all that smart - oh well!


We cooked (but didn't take many pictures).

White pizza

Sweet potato, red pepper, jalapeno, cauliflower, onion, and corn ready to be roasted for enchiladas.

I did some crafting and decorating.

I made a template for an 'S,' traced it onto some extra wood, had the husband cut it out for me, and then covered it in string.


I hung the letter with a canvas and a painting. The picture on the canvas is of our wedding bands in a flower and the painting, which I did some time ago, is of the state of North Carolina with a small dot where we got married.


We celebrated a very special first birthday!


Wednesday, February 8, 2012

Check it off the list!

You know that laundry room update we did awhile back? Well one of the projects was a drying rack. Again, the project has been near completion for months until this week! We're on a roll with checking things off our house list!

The project was inspired by images like this:

Country Living
I found a plan and the husband got to work. We made it pretty large because we have our fair share of things that need line drying and we have the space in our laundry room. You can tell by the pictures that it is hung pretty high. I can reach the top easily but hanging it high allows us even more walking space and makes it feel more open in the room when the drying rack is extended.


One more thing marked off the list!!

This was one of two "build-it" projects on our list. Unfortunately the other project is also in the "so close to being finished but not quite" stage. I hope to finish it in the next week or so and will update you with it then!


Tuesday, February 7, 2012

Guest bedroom projects

In addition to the new side tables, the guest bedroom received a bed face lift. Prior to the updates, the bed was an Ikea bed that sat low to the ground. Lets face it, none of us are getting younger so getting in and out of that thing wasn't working out well for most. See how low it was?


We upgraded to a bed on a normal frame but we were left without a headboard. I did some online perusing and decided on a tufted headboard. The husband and I made the headboard sometime in November but I never got around to covering the buttons (pain in the rear) and actually attaching them to the headboard, that is, until last week! Its nice to have another project completed. (Pictures are not terrific because, unfortunately, we go to work when its dark and get home right before dark.)


I have a few other ideas for the room to spruce it up but so far, these smallish changes have made a huge difference.


Monday, January 30, 2012

Small decorating updates

We've done some miscellaneous decorating over the past few months. One of the absolute last things I do in any room is put art, etc on the walls. I hate making the commitment because I'm almost always doubtful of how it will turn out.

Recently though, I was moved to finally add art to our long back hallway. A few months ago, I convinced the husband to stop by an estate sale while we were on our way home from running errands. We picked up a world atlas book and a whole set of state maps for about $10. I knew I could use these as art so it seemed like a great deal.

Sometime in November, the husband took on the job of cutting out the maps and putting them in some frames I picked up from Ikea (of course). We decided to go with places we've lived and visited. I love the personal touch and how inexpensive the whole thing turned out.


Monday, January 23, 2012

Guest bedroom changes

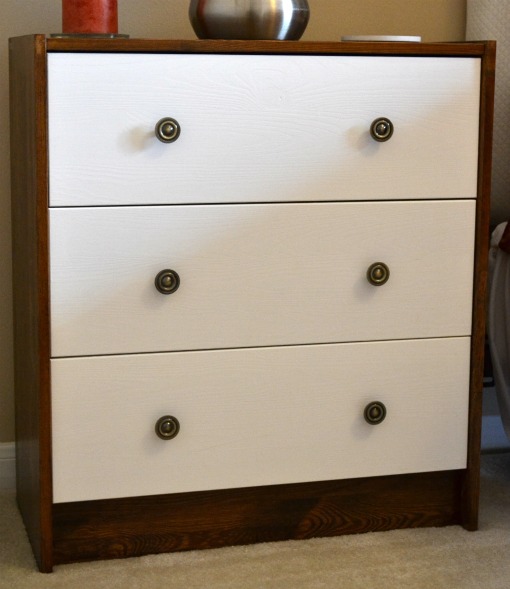
After some thought (and feedback from guests), we decided that the guest bedroom needed a few updates to make it a more comfortable place for visitors. Part of the changes included new bedside tables.

Taking inspiration from Aubrey + Lindsay's little House Blog and several other Ikea Rast hack, we picked up two Ikea rast side tables and went to work.

The Rast starts out like this (except, in true Ikea fashion, it comes in a thousand pieces that need assembly).


We decided to go with a stain and paint look. We used Minwax Dark Walnut to stain the outsides and top and an antique white we already had on hand. I picked up a few knobs at Home Depot and we were done. I think they turned out well. And if you look closely you can see part of some of the other changes in this room!


Wednesday, January 11, 2012

Its been awhile

The husband and I have slowly been updating various things around the house, but you wouldn't know that because I haven't gotten around to posting about the projects!

To tell you the truth, its almost absurd how much time we devoted to housing related projects over the last few months of last year. So, we're on a hiatus from home improving for awhile (maybe). But I suppose you might want to see what's changed or been updated.

Remember this list we came up with? Well we managed to get a number of things accomplished. I'm planning to update the blog every few days with pictures of our home adventures!

One of our first major projects was the office.

Before

Previous owner's take on the room.
In progress
Prior to doors
After doors
Now


What we have remaining:
  1. A few things for the walls (DIY potential here)
  2. A larger DIY project to add a furniture element
  3. A rug! (which will also likely be another DIY adventure)
I'll keep you updated on the progress. Oh and just for funsies, a picture of Gracie around Christmas time.